Header Tab

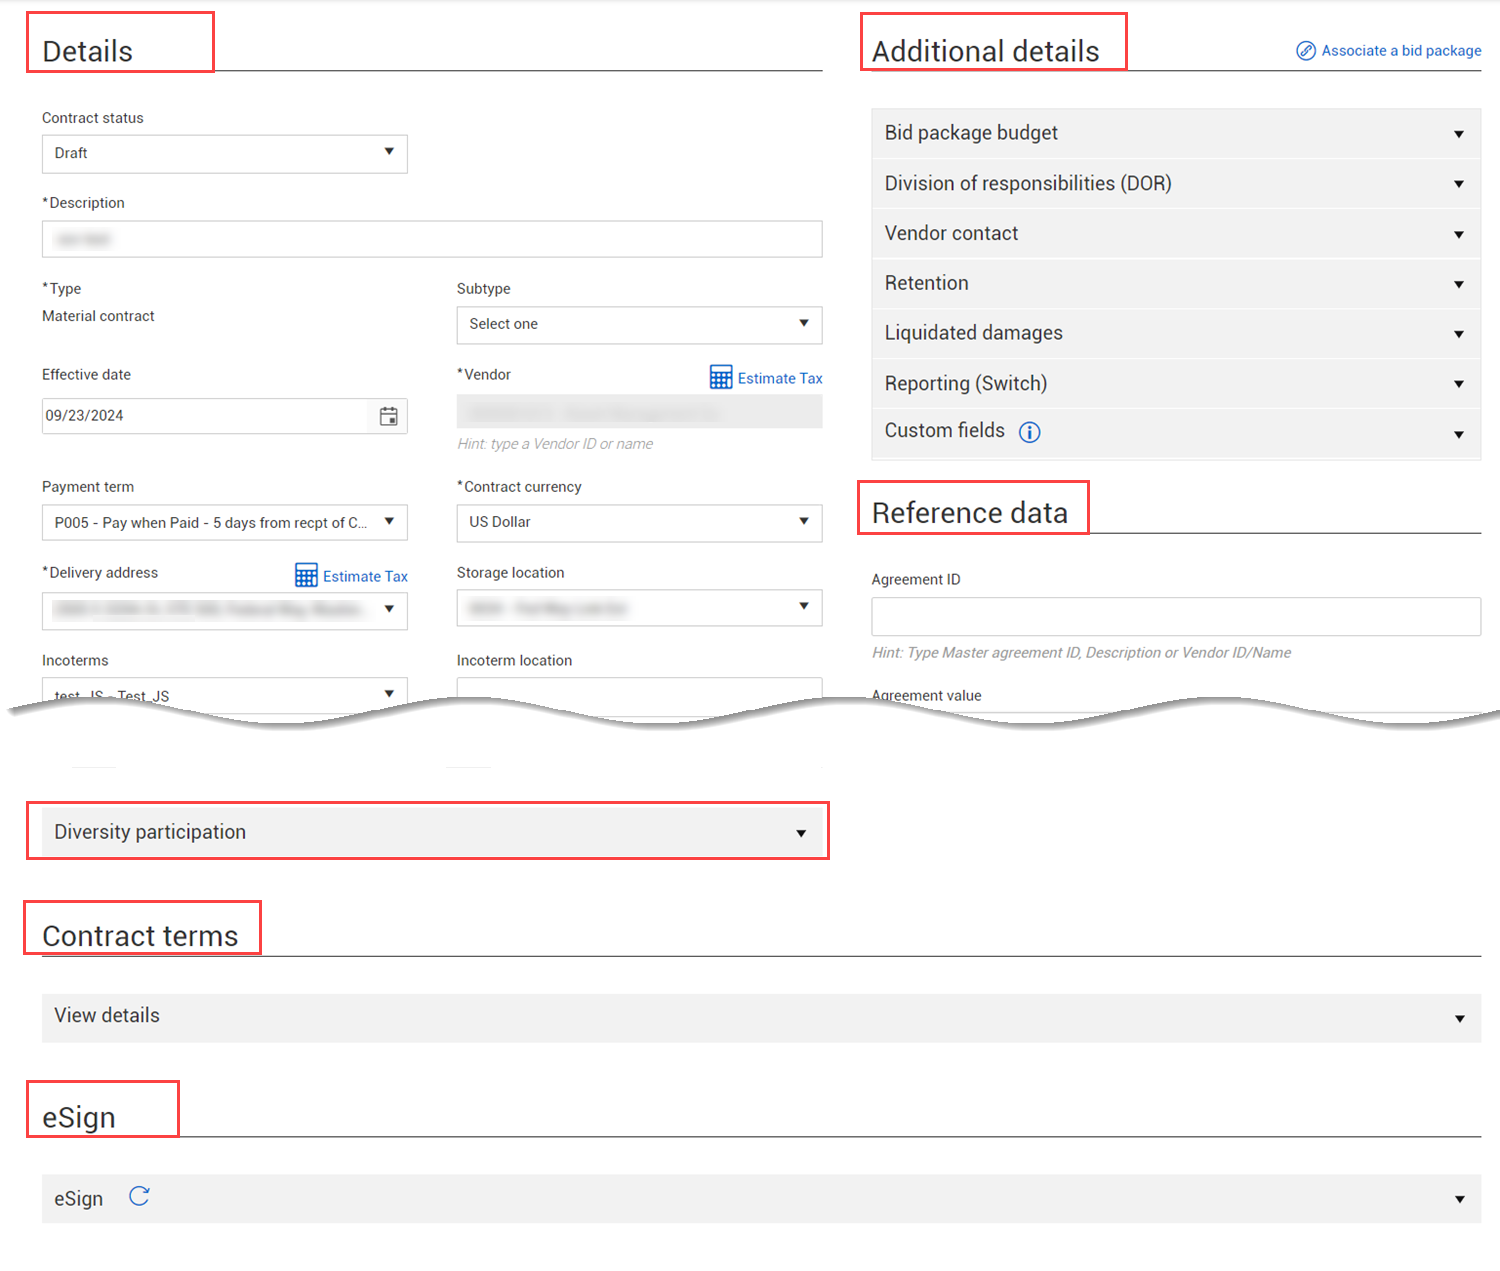
The Header Tab contains the following sections for capturing key contract information:

  • Details
  • Diversity participation
  • Contract terms
  • eSign
  • Additional details
  • Reference data

Each section of the Header tab is described below.

Details section

The Details section shows basic information about the contract

  Field/Section Function

1

Contract status

Drop-down of statuses you can change manually to track the progression of the contract. Contract must be in Executed status to publish a PO to the ERP system

Changing the contract status to Executed is the action that triggers the compliance review of supporting documents. Once the supporting documents are approved by Compliance, the Create Purchase Order button becomes active.

2

Description

Free text entry; Brief overview of the contract which will display in reports. The description can be edited as needed.

3

Type

Drop-down denoting the kind of contract. Different contract types map to different PO types in ERP system.

4

Subtype

An additional drop-down to further categorize contract type.

5

Effective date

Beginning date of the contract, the date in which both parties have signed the agreement.

6

Vendor

Drop-down menu of all vendors set up in ERP system. You can click the Advanced vendor search icon at the bottom of the list to see the Select vendor dialog box that shows more vendor details and has its own search function.

7

Payment term

Drop-down menu to indicate terms of payment for the contract. Only payment terms marked as Available in the Master data library are shown in the drop-down menu.

8

Contract currency

Drop-down menu; currency in which the vendor will be paid. If there is no vendor or if the vendor does not have a currency assigned to their record in the master data library, the field has a drop-down menu, so you can select the contract currency. A warning icon is shown when the selected Contract currency does not have an exchange rate set up in the Project details, and a yellow warning banner shows at the top of the page.

9

Delivery address

Drop-down menu; Location where materials are delivered, or services are performed.

Note: Delivery addresses can be added or modified in project settings with proper permissions.

10

Storage location

ERP entity for tracking materials within the ERP system.

11

Incoterms

International commercial terms that specify which party is responsible for material while in shipment to destination. Only Incoterms marked as Available in the Master data library are shown in the drop-down menu.

12

Incoterm location

Names the destination for Incoterms.

13

Country of origin

The country where the project is being built.

14

Discipline

Drop-down menu to indicate the discipline category the contract falls under.

15

Two-way match

Allows for paying invoices without formal goods receipts; typically used for progress payments.

16

Scope of contract

Free text entry field to provide more information on the contract’s scope. You can use the Expand icon to expand the text box for easy text entry and viewing. You can then collapse the text box when you are finished.

Following are additional details about the header tab.

Contract Status

The Contract status field is a drop-down that allows you to select the status of your contract.

The table below lists the status options available to select from.

Field/Section Function

Draft

The contract is still being created.

In review

Contract is following the workflow for approval.

Out for vendor signature

Contract is with the sub or vendor for signature.

Out for internal signature

Contract has been signed by vendor of subcontractor and is now routed for internal signatures.

Executed

Contract has been signed by both parties.

Terminated

Removed vendor or supplier off site.

Cancelled

Contract has been cancelled or never got executed.

Closed

Contract has been completed and closed out.

Description

Description is a free text field where you can enter the information to describe what the contract is for (e.g., Steel – Supply and Install).

Type

The contract type will already be populated from when the user added a new contract.

Contract Subtype

Created to further categorize contracts, subtypes which can be added to each contract type in your organization settings. Configure your organization settings by first creating a new subtype and then associate it to an existing contract type.

A screenshot of a cell phone

Description generated with very high confidence

From the Organizational settings, select Contract > Contracts > Settings.

Go to Contract configurations, then select the settings icon under Contract type name.

In the Subtype configurations slide out panel, select the subtypes tab.

To add a subtype, click in the new field under the Subtype name. Type in the name of your new subtype, then click on the Add     icon to add to your list.  Then click Save.  The new subtype can now be added to any contract type.

Effective Date

The effective date is when your contract has been executed and becomes an official legal document.

Vendor

The Vendor drop-down list shows all vendors that you have set up in the system. Once they are added to your vendor data base you will be able to search for them by vendor number or by company name.

It is important to make sure you have the correct vendor tied to this contract as it will determine who gets paid from your ERP system

The Estimate Tax calculator for this field lets you estimate the tax for the contract line items. Prior to publishing a contract, if you click Estimate tax, taxes are calculated based on the tax types and their default percent listed in project settings. The estimated taxes are shown in the contract's line items and the contract totals. When the contract is published, tax information is updated from the Purchase order response.

Payment Term

Your payment terms are what you and the vendor or subcontractor agree on during contract negotiations. From the drop-down list, you can select from several different options that InEight Contract pushes to the ERP system. Once you have set these and executed the contract, it is difficult to change afterwards.

Only payment terms marked as Available in the Master data library are shown in the drop-down menu.

Contract Currency

You will need to select the correct currency for payment to the vendor. This should be determined during contract negotiations and discussed with your business team to make sure you are able to pay the vendor with the agreed upon currency prior to contract execution. If a vendor has not been selected, the currency of the contract is used.

Delivery Address / Storage Location

The delivery address will be set up during your project initiation. For instances where you want the material to be delivered to a yard or a storage facility, or a subcontractor to show up to perform work at an identified onsite location, you will have the option of picking that address.

The Estimate Tax calculator for this field lets you estimate the tax for the contract line items. Prior to publishing a contract, if you click Estimate tax, taxes are calculated based on the tax types and their default percent listed in project settings. The estimated taxes are shown in the contract's line items and the contract totals. When the contract is published, tax information is updated from the Purchase order response.

Incoterms

Incoterms indicate who is responsible for the material during shipment to the jobsite or the storage location. This will default into the Vendor Master Record as terms for the materials to be shipped.

Only Incoterms marked as Available in the Master data library are shown in the drop-down menu.

Country of origin

A pull-down with a selection of countries where the project is located.

A screenshot of a cell phone

Description generated with very high confidence

Two-way match

The two-way match function in the contract module allows you to set a predetermined plan to pay a vendor. This plan is paid against a set schedule, such as completion milestones or progress payments.

If Yes is selected, the ability to create goods receipts against the purchase order and denotes the goods receipt as not applicable for all line items is disabled. When the purchase order is published, the ERP system can be mapped to create an invoice plan.

If you do not know if your contract will have an invoice plan, the best practice is to leave the setting selected to No. Otherwise, if you select Yes and then determine that an invoice plan is not correct after the contract has been pushed to the ERP system, the ERP system does not allow you to make this correction; a new contract must be drafted. 

Use the toggle to set Two-way match feature to Yes or No.

Discipline

The discipline pull-down list will provide the type of discipline categories you can choose for your contract. The disciplines are pulled from the master data set up in InEight Platform.

A screenshot of a cell phone

Description generated with very high confidence

Scope of contract

Free text area where you can indicate the scope of your contract.

A close up of a logo

Description generated with very high confidence

Diversity participation

Diversity participation is required on certain contracts and can be federally regulated. Diversity participation can include, but is not limited to

  • Disadvantaged Business Enterprise (DBE)
  • Minority and Women Owned Business Enterprise (MWBE)
  • Service Disabled Veteran Owned Business Program (SDVOB)
  • On-the-Job Supportive Services Programs (OJT/SS)

The following steps walk you through how to add diversity participation to your contract.

Add Diversity Participation

  1. On the record page for the contract you created in Step by Step 5.2.2, select the Header tab.

  2. Under Diversity participation, use the toggle slider to set Diversity Participation to Yes.

  3. Select an Applicable Diversity Category.

    • To add multiple Diversity Participation Categories, click the Add Category Icon as many times as needed.

    The percentage and value of the diversity participation can be tracked at an individual line item level. This allows lines which do not count toward diversity participation to be excluded from reporting.

Contract terms

The Contract terms section includes free-text fields where you write the language which is in the physical contract document, such as inclusions, exclusions, warranty information and other contract terms. You can expand the View details section for easy text entry and viewing. You can collapse the section when you are finished.

Some contracts have paragraphs for inclusions that list all the items that are included in the contract. A contract manager would write in that field and then use the tag for inclusions in Contract writer to generate the Microsoft Word document.

If you are not generating the Word document from Contract, you can use the field to write what is included and then use that field for reference, so you do not have to open the scanned contract to read.

A screenshot of a social media post

Description generated with very high confidence

eSign

The eSign section lets you view or add recipients to be used as default eSign signees. This section has subsections for eSign, Project contacts, and division of responsibility. All signees must be added to at least one section.

  • Names in the eSign section are populated from the project eSign setup tab (Project settings > Contract > Configrations > eSign setup). You can also manually enter the names of the signees.

  • Names in the Project contacts section are populated with contact information from Project contacts added in Project details. This section is for reference only. If you want to add or change recipients, you must edit the Project Contacts.

  • Names in the Division of responsibility section are populated with user information defined in the Division of responsibilities section of the contract details. The company is populated from the Company legal name in Project details. The title field is always blank. This section is for reference only. If you want to add or change recipients, you must edit them in the Division of responsibility section of the Additional details.

Additional details

The Additional details section includes expandable sections for detailed contract information.

Field/Section Function

Associate a bid package

Prompts a window containing a list of all unassociated bid packages in the project. This feature allows you to associate a bid package to the contract after creating the contract.

Bid Package budget

Generates a quick look on where production is from the budget.

Division of Responsibilities

Comes over from Bid package when converting.

Vendor contact The project assigned contacts associated to the contract vendor, or you can enter any name in this field.

Retention

Amount entered will pre-populate each line item for hold back during invoice payment.

Liquidated damages

Free text entry in terms of percentage or $ value. Maximum allowed liquidated damages per the contract.

Technical field assistance

Select Yes or No to specify vendor or supplier to provide  on-site commissioning or training.

Reporting (Switch)

Allows some contracts to be omitted from standard reporting. Typically used for low risk contracts which don’t require high visibility.

Custom fields Fields you can use for entering information that is not covered on the tab.

Bid Package Budget

Gives you a glance overview of the budget running against the bid package associated to your contract.

A screenshot of a cell phone

Description generated with very high confidence

Division of Responsibilities (DOR)

These are roles that will be available to assign a person to when creating a bid package in Project Settings.

A screenshot of a cell phone

Description generated with very high confidence

You can remove a role from being needed on a bid package. The drop-down for that role will then not appear when creating a new bid package.

Vendor contact

Vendor contacts are defined in the project Assigned contacts associated with the contract vendor. Use the Vendor contact section to select a contact to be the primary contact for the contract.

If there are no contacts defined for the vendor, the list is empty and you cannot add a contact. If a vendor is changed or removed from the contract, the contact is removed.

Retention

Retention is the amount of money that is held back from each invoice until the contract is complete. A contractor will always want to retain (hold back) a certain percentage of each invoice, as it ensures that the vendor or subcontractor will continue to work until their scope is complete. In some cases, retention will be waived. This typically happens when the relationship between vendor and contractor is strong. In some cases, you will want to waive the retention; this is a case by case decision your company would make.

The amount of retention appears on each line item in the contract but is editable to suit those lines which should not have retention. 

Tax Jurisdictions

All organizations do not require a notification with a tax jurisdiction, selecting the Tax Jurisdiction notification has a toggle ON or OFF. These are for clients which do not have a tax system. Access this toggle from the Organization settings > Contract > Notifications.

Liquidated Damages

Liquidated Damages will occur when your vendor or subcontractor fails to meet milestones, material delivery dates and other specific dates that have been agreed on in the terms and conditions in the executed document. Many times, this will result in financial compensation. 

Technical Field Assistance

Technical Field Assistance is used when your contracted vendor or supplier is specified in the contract to provide field personnel for on-site commissioning or training. When a contract has technical field assistance written into the vendor contract, those specifics can be added to the Technical field assistance section in the Header tab. You can enter the Description, Contracted Quantity, Unit of Measure, Unit Price, and comments for the purposes of tracking assistance from the Vendor. All this information must be a part of the signed executed contract with the Vendor or subcontractor. 

Adding this to your contract will give you the capability to track your budget for your technical field assistance. This helps as a tracking tool to reduce overruns.

The following steps walk you through how to turn on the tracking of technical field assistance for your contract.

Enable Technical Field Assistance

  1. On the record page for the contract you created in Step by Step 5.2.2, select the Header tab.

  2. Under the Additional details section, expand the Technical field assistance menu and use the toggle slider to set Technical Field Assistance to Yes.

    Selecting Yes adds a Technical Field Assistance tab to the main contract page.

  3. In the Technical field assistance table at the bottom of the form, complete the table below with the following:

    • Select the remove icon Double time and any other entries so you end up with just Standard Time, Overtime, and Trip
    • Standard time:  100 MH, $45/mh
    • Overtime:  20 MH, $67.50/mh
    • Trip: 5 EA, $500/EA

  4. Click Save at the top of the page.

    To track technical field assistance on the Technical field assistance tab that is now enabled, follow the steps below.

Add Technical Field Assistance

  1. On the record page for the contract you created in Step by Step 5.2.2, select the Technical Field Assistance tab.

  2. Click the Add Technical Field Assistance icon at the top left of your screen under actions.

  3. In the Add technical field assistance window, complete the fields with the following information:

    • Description: Standard time
    • Date: last week
    • Technician Name:  Mary Smith
    • Work performed: Inspection
    • Quantity: 4  
    • Unit Price: [this will populate from the previous page]
    • Warranty work: Select Yes or No depending on your specific operation
    • Approved by: [Select a name]
    • Comments: [None]

  4. Select Add.

    • The Widgets will update and track remaining technical field assistance (TFA)

    A screenshot of a cell phone

Description generated with high confidence

Reporting (Switch)

The reporting toggle allows you to include or exclude each contract from reporting functions. Toggle the button to “Yes” if you want this contract to show up in reports, (e.g., Buyout Log, Procurement Status Report).

Reference data

Reference data is generated by agreements and purchase orders generated under the contract. These values can be entered manually or be received from a JSON PO response from your ERP system. If the values received from your ERP system are different, they will be updated in the Header tab. If values are blank in your ERP system, those fields will not be updated in Contract. These fields are also available as columns in the Contracts list.

When you copy a contract with an inactive vendor, the Agreement ID field still has the master agreement ID, but the field is treated as a free-text field for reference; the contract is not actually associated to the master agreement. If you activate the vendor, you must manually associate the master agreement to the contract.

Importing a Contract template

If you have contract details already established on a spreadsheet and want to import this data into Contract, Contract enables you to import that data into the program. Select the Import icon to begin the process of importing this data.

On the top right of the screen is the Import icon. When selected, it will open the download the Import data from template screen. You can import a template to complete or drag and drop your existing template for importing back into Contract.

The following data will have values will be populated automatically.

For Contract Line import template, the following data will have their values populated:

  • Currency
  • Pay terms
  • Inco terms
  • Discipline
  • SubType
  • Contract type
  • Storage location

After the spreadsheet is completed, save and drag it onto the to import it into Contract. The contract description is limited to 100 characters. If the description exceeds 100 characters, an error is shown in the import pending area of the import history.

Contract validates the dates based on the person who imports the data. If the dates do not match the preferences of that person, Contract generates an error in the import history and removes the date.

Contract automatically generates an email with the import results. The email contains a link to view the Import History window where you can remove or fix the errors. To filter errors, click the Errors link at the bottom of the page. A filtered error page shows the remaining errors.

No records are imported if there are any errors in the file.

Create forms or mail in InEight Document

If a project is associated with Document, you can create a form or mail item from a contract. Document saves the form or mail and creates a link in the Supporting documents tab.

Single-sign on is available for Contract-to-Document features, such as creating mail or a form. When you use one of these features, the Document sign-on page opens, and you can enter your credentials. This creates a sign-on token that lets you remain signed in until the session ends. The first time you sign in to Document, a black secondary window and the Document Home window also open. You can close these windows. Single sign-on is activated, and they are not shown again.

Creating forms or mail is initiated from the Actions menu. If Actions > Create document > Form or Mail is inactive, you can select the Settings (cogwheel) icon in the Actions menu to set up integration with Document.

Create a form in Document

You can create a Client RFI or Request For Information form in Document and add it to the Supporting documents for the contract in a single procedure.

  1. From the Details page go to Actions > Create document, and then select Form.

  2. If you are not already signed into Document, use your credentials to sign into InEight Document.

    A sign-in token is created that lets you remain signed in to Document until the session ends. If this is the first time you are signing in to Document from Contract, a black secondary window and the Document Home window are shown. After you close these windows, single sign-on (SSO) to Document is activated, and they are not shown again.

  3. The Create new form dialog box opens. Select the form type, and then click Next. The Request for information window opens in Document.

  4. Complete the form, and then select the users for distribution of your form. A success message is shown and a link to the form is added to the Add supporting documents dialog box.

  5. Click Add to add the form as a supporting document.

Create mail in Document

You can create a mail item in Document and add it to the Supporting documents for the contract in a single procedure.

  1. From the Details page go to Actions > Create document > Mail.

  2. If you are not already signed into Document, use your credentials to sign into InEight Document.

  3. The Create Document Mail dialog box opens. Select the mail type from the list defined in Document that are specific to the project's mail type, and then click Next.

  4. Optionally add an attachment. If you selected documents on the Supporting documents page before you started the action, they are automatically included.

    • To add an attachment from the Supporting documents tab, click Next. The Select documents dialog box opens. You can choose documents from the Supporting documents tab with the Document source My computer. After you attach the documents, click Create. The Mail module opens in Document with your attachments included.

    • To add an attachment in Document, click Create. The Mail module opens in Document. Click Attach files > Attach Documents, where you can search for the document. After you select a document, click Save.

    • To send mail without an attachment, click Create. The Mail module in Document opens.

  5. Enter information in the To and Subject fields. The other fields on the page are optional. Enter or update the fields as needed for the mail message, and then click Send. A summary page opens.

  6. Edit links and notes, if needed. The mail is added in Document.

  7. Close the Document window. You are then prompted to add the mail as a supporting document in Contract. The document type defaults to Correspondence but can be changed.

  8. Click Save to save the mail to the Supporting documents page.